

How To Share A Folder In Windows Server 2012
Microsoft take fabricated lot of improvements inServer 2012. One of the major changes isServer Manager. Server Manager is now linked with nigh all the server roles. Server Managing director allows you to easily share folder in Windows Server 2012. Shared folders on the network allows many users to access the files and folders. Think, folders can be shared but individual files cannot exist shared straight. File Server function must be installed prior to exist able to share files and folder on the network. In Server 2012, the File Server role is installed by default allowing users to share files and folders. The File Server sub-role is found under File and Storage Services server part in server role installation wizard. File Server in Server 2012 uses SMB 3.0 protocol.
Share Folder in Windows Server 2012
There are different ways to share a folder in Server 2012. About efficient style is to use the Server Managing director. Here, I volition configure some shared folder from domain controller named MBG-DC1. So, let'due south setup some shared folders. To do so, open Server Manager. Click File and Storage Services on the left pane. Then click Shares from the list. Yous volition run across the listing of shared folders on this server. As you can see below there are two folders, netlogon and sysvol shared by default. This is because the server is AD DC.

We have a scenario. We desire to share a folder namedMarketing to Marketing users grouping. Nosotros desire but the marketing users to view and execute the contents of the folder. We already have Marketing users group prepare and assigned users into the group. Then, let'due south create the shared folder. To create a new shared folder, click Tasks and click New sharein Server Director console.

New share wizard pops upwards. There are number of share profiles by default. Y'all can choose any of these share profiles as seen below. I volition cull SMB Share – Quick and click Next.

At present you are asked to provide the share location of the binder that you want to share. I volition choose custom location as C:\Marketing. Then click Next.

Type the share name and description of the shared binder. Then click Adjacent. Click OK to create the new directory on path doesn't exist warning.

Now configure other settings. Here, I will bank check to enable access-based enumeration. This option makes the folder visible for users that have permission to access the folder otherwise the folder will be hidden. Permit caching of share pick makes the folder to be accessed fifty-fifty when the user is offline. Click Side by side.

Hither, configure the folder permission. The shared folder have shared folder permission and NTFS permission. These both permission work together to allow/deny users to access the shared folder. Microsoft recommends to allow full control for share permission and utilize NTFS permission to restrict and configure folder access. As you can see beneath, Share permissions: Everyone Total Control. The permission shown here, is the inherited NTFS permission from drive NTFS permission. To change the permission, click Customize permission.

Click disable inheritance. Then select convert inherited permission into explicit permissions on this object.

You tin encounter the changes below. Remove both User groups from the permission. This Users group contains all the users of the domain. We don't want all the users of the domain to admission this shared folder and then remove it. Click Add to add the marketing group. Click Select a principal and add Marketing group. Select the basic permissions and click OK.
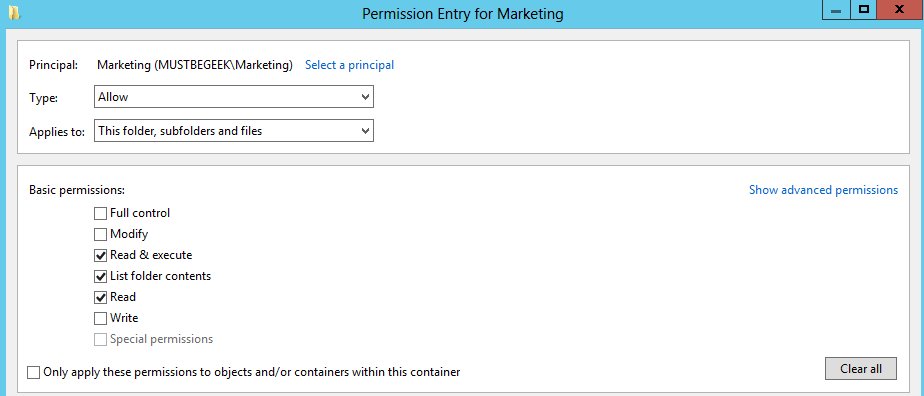
Now the overall permission for the Marketing folder looks similar this. Users of marketing group tin can only read the files of Marketing binder.

Now let's come up back to the wizard. Click Side by side.

Review the settings and click Create.

The shared folder is now created. You tin view the shared folder in Server Managerconsole.

In this way you lot tin configure shared folder using Server Manager. Remember, NTFS permissions and shared folder permissions are dissimilar. If NTFS permission and shared binder permission are conflicting, then the most restrictive permission is practical. For example, if yous configure NTFS permission to Full Command and shared permission to Read on a folder then the permission applied will be Read but. Best practise to manage permissions for shared folder is, configure full control permission for everyone and restrict the folder access using NTFS permission.
Clients can now admission the shared folder by typing the UNC (Universal Naming Convention) path of the shared folder in windows explorer. In our example, the UNC path is, \\MBG-DC1\Marketing .

In this way you lot can share a folder and admission the shared binder contents.
The post-obit two tabs change content beneath.
- Bio
- Latest Posts
![]()
Bipin is a freelance Network and System Engineer with expertise on Cisco, Juniper, Microsoft, VMware, and other technologies. You can rent him on UpWork. Bipin enjoys writing manufactures and tutorials related to Network technologies. Some of his certifications are, MCSE:Messaging, JNCIP-SEC, JNCIS-ENT, and others.
![]()
Source: https://www.mustbegeek.com/share-folder-in-windows-server-2012/
Posted by: maldonadosoused.blogspot.com
0 Response to "How To Share A Folder In Windows Server 2012"
Post a Comment